Smart home technology has transformed the way we live — and nowhere is that more apparent than in the realm of home security. With a well-designed smart security system, you can monitor your home, deter intruders, and enjoy true peace of mind — all from your smartphone.
If you’re wondering how to set up a smart security system without getting overwhelmed by technical jargon, you’re in the right place. In this comprehensive guide, you’ll learn what equipment you need, how to install it, and how to make sure everything runs smoothly.
Whether you’re a first-time homeowner or looking to upgrade your old alarm system, these steps will help you secure your home in a modern, convenient way.
Why Choose a Smart Security System?
Traditional alarm systems are being replaced by smart security solutions for good reason. A smart system offers flexibility, real-time monitoring, remote access, and instant alerts.
Want to check on your dog while you’re at work? Or see who’s ringing the doorbell when you’re on vacation? Smart security makes it all possible.
Plus, smart systems often integrate with other smart home devices like lights, thermostats, and voice assistants, creating a seamless living experience.
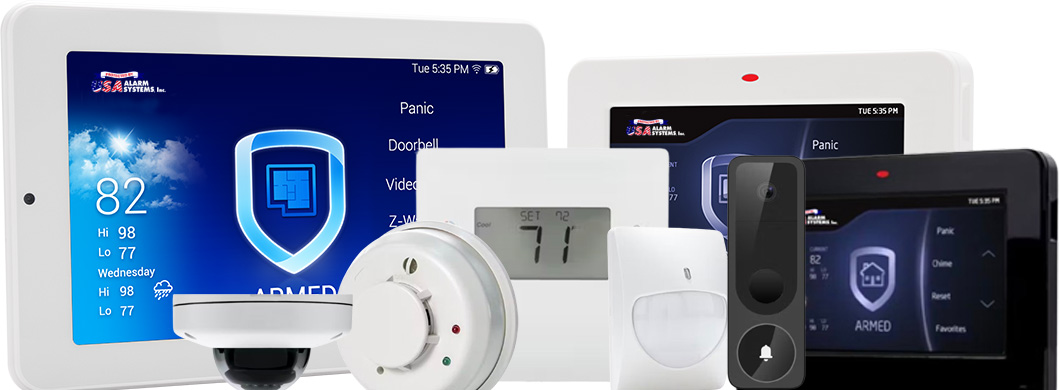
What You’ll Need for a Smart Security System
Before you start drilling holes or mounting cameras, it helps to know what your setup should include.
Here are some essential components:
- Smart Hub or Base Station: This is the brain of your system, connecting all your devices.
- Indoor and Outdoor Cameras: These let you monitor every corner of your property, inside and out.
- Motion Sensors: Place them near entry points to detect unexpected movement.
- Door and Window Sensors: Get alerts when doors or windows open.
- Smart Doorbell Camera: See and talk to visitors remotely.
- Smart Locks: Control and monitor door access from anywhere.
- Alarm Siren: Alerts you and scares off intruders.
Optional add-ons include smart smoke detectors, glass break sensors, and flood sensors for extra peace of mind.
Step 1: Assess Your Security Needs
Every home is different. Start by walking around your property and noting vulnerable areas.
Consider:
- How many entry points do you have?
- Are there hidden spots where intruders could hide?
- Do you want 24/7 indoor monitoring, or just exterior coverage?
Create a rough plan of where you’d like to place cameras, sensors, and other devices. This will help you buy the right equipment and avoid unnecessary spending.
Step 2: Choose the Right Smart Security System
There are plenty of reputable brands on the market — Ring, Arlo, SimpliSafe, and Google Nest are popular in Tier-1 countries like the US, UK, Canada, and Australia.
When choosing a system, look for:
- Compatibility: Does it work with your phone and smart home ecosystem (Alexa, Google Home, Apple HomeKit)?
- Connectivity: Does it rely on Wi-Fi, cellular backup, or both?
- Ease of Use: Is the app user-friendly?
- Professional Monitoring: Do you want to self-monitor or pay for 24/7 professional monitoring?
Compare features, costs, and subscription fees before committing.
Step 3: Install Your Smart Hub or Base Station
Once you’ve bought your system, start by setting up the hub. This connects all your devices to the network.
Place it in a central, secure location with a strong Wi-Fi signal. Plug it in, follow the manufacturer’s instructions, and link it to your home Wi-Fi network.
Most systems have a simple app setup process that guides you step by step.
Step 4: Install Cameras and Sensors
Here’s where your planning pays off.
Outdoor Cameras: Position them at entry points like front and back doors, garage doors, and driveways. Place them high enough to prevent tampering, but angled well for a clear view. Ensure they’re weatherproof.
Indoor Cameras: Focus on common areas like living rooms, hallways, and entryways. Avoid pointing cameras at private areas like bathrooms.
Motion Sensors and Contact Sensors: Install motion detectors near large windows, hallways, or any place where an intruder might pass. Door and window sensors should be placed at all accessible points of entry.
Most devices come with adhesive strips or screws. Take your time to position everything properly. Test each sensor and camera angle to ensure full coverage.
Step 5: Connect and Configure Devices
Use the system’s app to pair each device with your hub.
Name each device logically (e.g., “Front Door Camera” or “Garage Motion Sensor”) so you can easily manage alerts later.
Adjust sensitivity settings to avoid false alarms — for instance, you don’t want your system to ping you every time a tree branch sways.
Step 6: Secure Your Wi-Fi Network
Your smart security system relies on your home Wi-Fi. If your network isn’t secure, neither is your system.
Change default passwords on your router and devices. Use strong, unique passwords and enable WPA3 or the highest security protocol your router supports.
Consider setting up a separate network for smart home devices to prevent cross-access if your main network is ever compromised.
Step 7: Test Your System
Before you sit back and relax, test every piece of equipment.
Walk around and trigger motion sensors, open doors and windows to test contact sensors, and review live camera feeds for blind spots.
Most systems allow you to run test alarms without alerting emergency services — use this feature to make sure everything works as intended.
Step 8: Set Up Alerts and Automations
One of the best parts about smart security is customizing alerts.
Decide when and how you want to receive notifications — push alerts, emails, or texts.
You can also automate actions. For example, when your camera detects motion, it can automatically turn on outdoor lights or record a video clip.
These features help you respond quickly to potential threats.
Step 9: Consider Professional Monitoring
While DIY monitoring can be cost-effective, professional monitoring provides added security.
If you’re away or can’t respond to an alert, a monitoring center can notify emergency services on your behalf.
Many smart security providers offer affordable monthly plans. Weigh the pros and cons and choose what’s right for you.
Step 10: Maintain and Update Your System
A smart security system isn’t “set it and forget it.”
Regularly check your devices to ensure they’re working correctly. Clean your camera lenses for clear footage.
Keep your system’s firmware up to date to patch vulnerabilities and improve performance.
Change batteries when needed and test your system every few months.
Tips for Getting the Most Out of Your Smart Security System
- Blend Security with Privacy: Position cameras to monitor vulnerable areas without invading personal spaces.
- Use Smart Integrations: Connect your system with smart lights or smart locks for added convenience.
- Share Access Wisely: If family or trusted neighbors need access, make sure they know how to use the app.
- Stay Informed: Check for software updates and new features your provider might release.
The Peace of Mind You Deserve
Setting up a smart security system might feel intimidating at first, but the payoff is worth it. With a little planning, you can protect your home, loved ones, and belongings in a way that’s flexible and easy to manage.
Plus, smart security can boost your property’s value — an attractive bonus if you ever decide to sell.
Your home should feel like a safe haven, no matter where you are in the world. So take this step today and enjoy the peace of mind that comes with a smart, secure home.
Ready to Protect Your Home?
Now you know exactly how to set up a smart security system that works for you.
Start with a solid plan, choose the right equipment, secure your network, and stay vigilant.
If you found this guide helpful, share it with your friends and family — they deserve a safer home too!
Want help choosing the best smart security system for your needs? Get in touch today — your peace of mind is just a click away.