Are you ready to ditch cling film and plastic wrap for an eco-friendly, reusable alternative? DIY beeswax food wraps are a chic, sustainable solution for keeping your food fresh while reducing waste in your kitchen. Not only are these wraps simple to make, but they also add a touch of charm to your food storage and lunch packing routines. This easy project is perfect for beginners, crafters, and anyone seeking a greener lifestyle. In this comprehensive guide, we’ll walk you through everything you need to know about making your own beeswax food wraps at home.
What Are Beeswax Food Wraps?
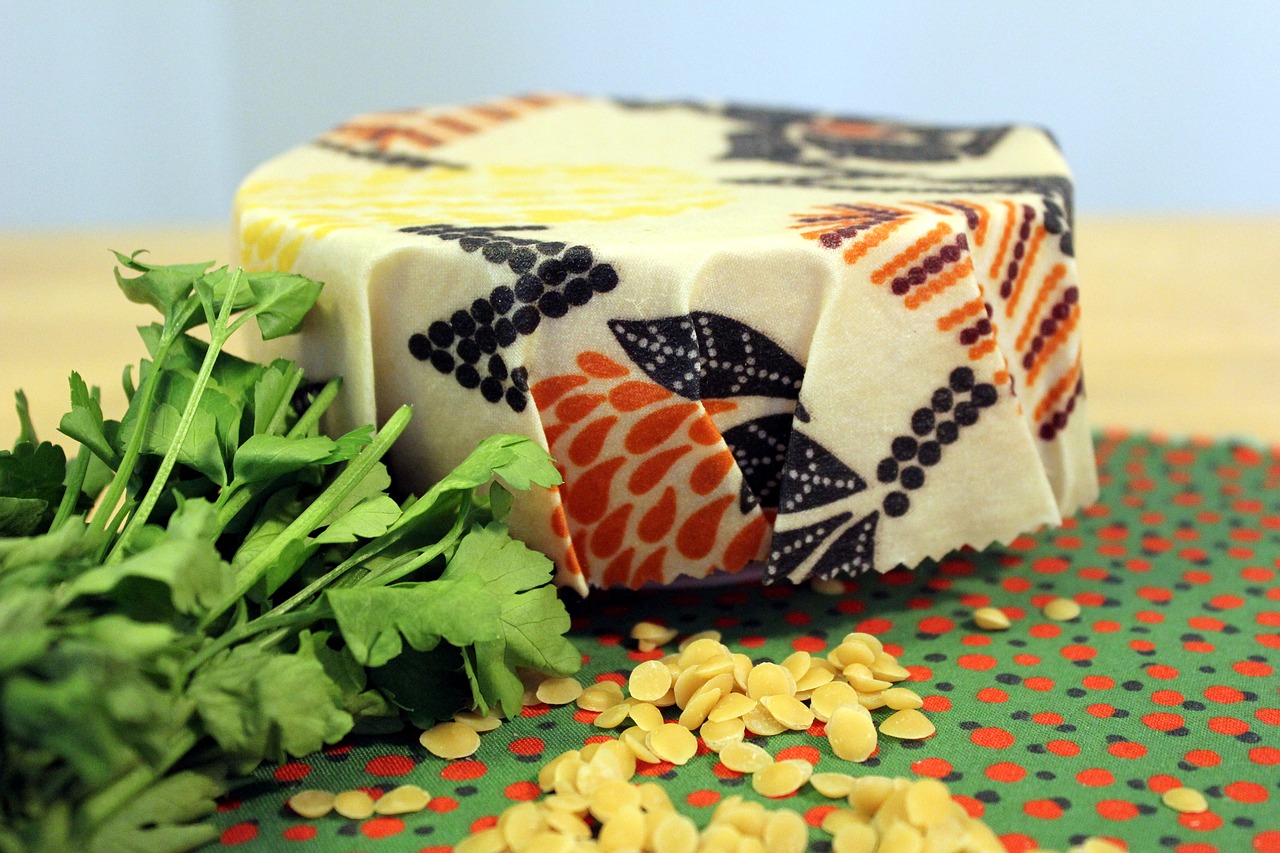
Beeswax food wraps are fabric sheets that have been infused with a blend of beeswax, resin, and oil. This combination creates a flexible, slightly tacky wrap that molds around food and containers, forming a breathable seal. They’re ideal for covering bowls, wrapping sandwiches, preserving produce, or even bundling up snacks for on-the-go meals. Beeswax wraps are biodegradable and naturally antimicrobial, making them an excellent zero-waste substitute for single-use plastics.
Benefits of DIY Beeswax Food Wraps
Making your own beeswax food wraps offers a range of advantages:
- Eco-friendly: Reduce your reliance on single-use plastics and cut down on household waste.
- Reusable: With proper care, these wraps can last for up to a year or more.
- Cost-effective: DIY wraps are less expensive than store-bought versions, especially if you make several at once.
- Customizable: Choose your favorite fabrics, sizes, and even mix in scents like lavender for a personalized touch.
- Food-safe: Beeswax is naturally resistant to bacteria and moisture.
- Chic & Stylish: Brighten up your fridge and lunch box with unique patterns and colors.
Essential Supplies for Making Beeswax Food Wraps
Gathering the right supplies is key to successful DIY beeswax wraps. Here’s what you’ll need:
- 100% Cotton Fabric: Lightweight, tightly woven cotton works best. Consider upcycling old shirts or buying fun new prints.
- Beeswax Pellets or Blocks: Opt for food-grade, sustainably sourced beeswax for safe food contact.
- Jojoba Oil or Coconut Oil: Adds flexibility, making wraps more pliable.
- Pine Resin (optional): Provides extra stickiness, helping wraps grip bowls and fold securely.
- Parchment Paper: Keeps your iron and work surfaces clean.
- Iron and Ironing Board: For melting and evenly distributing the wax.
- Paintbrush: To spread melted wax smoothly.
- Scissors or Rotary Cutter: Pinking shears are great for reducing fabric fray.
Step-by-Step Guide: How to Make Beeswax Food Wraps
1. Prepare Your Fabric
Wash and dry your cotton fabric to remove any residues. Cut into the desired shapes using scissors or a rotary cutter. Popular sizes include 8x8in (snacks), 12x12in (sandwiches), and 14x14in (bread or large bowls).
2. Create the Beeswax Mixture
In a double boiler, melt together your beeswax, a splash of jojoba or coconut oil, and pine resin if using. For each 12x12in piece of fabric, use about 1 tablespoon of beeswax, 1/2 teaspoon of oil, and 1 teaspoon of resin. Stir until everything is fully melted and combined.
3. Apply the Beeswax Mixture
Lay a sheet of parchment paper on your ironing board. Place your cut fabric on top. Brush a thin, even layer of the melted wax mixture across the fabric, making sure to cover the edges.
4. Melt and Distribute the Wax
Place another piece of parchment paper on top. Use a hot iron (no steam) to gently press and melt the wax through the fabric, distributing it evenly. Move the iron and check frequently to ensure all fabric is coated. Add more wax mixture if any dry patches remain.
5. Dry and Cure
Carefully lift the wrap and wave it gently for a few seconds—it’ll dry almost instantly. Hang or lay flat for a couple of minutes to ensure it’s fully set.
How to Use Beeswax Food Wraps
Beeswax food wraps are as versatile as plastic wrap, but far better for the planet:
- Cover bowls and dishes for fridge storage.
- Wrap cheese, bread, fruit, and veggies to prolong freshness.
- Fold wraps into handy snack pouches.
- Roll up sandwiches for waste-free lunches.
Warm the wrap in your hands and press gently; the heat activates the beeswax, helping the wrap stick to itself and your containers.
Caring for Your Beeswax Food Wraps
Extend the life of your wraps with these simple care tips:
- Hand wash in cold, mild soapy water—never hot, as heat melts the wax.
- Air dry thoroughly before storing.
- Keep away from raw meat, hot foods, and the dishwasher.
- Refresh wraps by melting more wax and reapplying if they become worn.
With proper care, your beeswax wraps can last for months.
Troubleshooting DIY Beeswax Wraps
If your beeswax food wraps are too stiff or not sticky enough, don’t worry! Here’s how to fix common issues:
- Not sticky enough: Try remelting with more resin.
- Stiffness: Too much beeswax. Rebake with a touch more oil.
- Uneven coating: Distribute with a brush or iron again for a smoother finish.
Experimenting a little leads to your ideal reusable wrap.
Customize Your DIY Beeswax Wraps
- Patterns & Colors: Go wild with fabric choices that show off your style.
- Unique Scents: Add a drop or two of food-safe essential oil (like lemon or lavender) for a signature fragrance.
- Personalized Sizes: Cut wraps to fit your containers, jars, and snack bags for tailored convenience.
Why Choose Beeswax Food Wraps Over Plastic?
Today, sustainability matters more than ever. Beeswax wraps are biodegradable, compostable, and made from natural materials—no chemicals or microplastics will leach into your food or the environment. By choosing DIY wraps over plastic wrap, you help protect oceans, wildlife, and future generations from plastic pollution.
Where to Source Beeswax and Supplies (General Tips)
Resourcing is simple, especially if you’re crafty:
- Beeswax pellets or blocks are often sold at craft stores or farmers markets.
- Experiment with leftover fabrics from old shirts or sheets for a mindful, upcycled approach.
Conclusion
Crafting your own beeswax food wraps is a fun, rewarding, and sustainable way to overhaul your kitchen habits. These wraps offer a handmade touch to everyday living, keep your food fresh, and replace wasteful plastics with something beautiful and eco-friendly.
Isn’t it time you gave your kitchen a sustainable upgrade and made DIY beeswax wraps part of your daily routine? Let’s make a difference, one wrap at a time!
Ready to kick plastic wrap to the curb? Try making your own DIY beeswax food wraps today and join the movement for a greener, cleaner future!